创建 Canvas
<canvas></canvas> 是html5出现的新标签,像所有的dom对象一样它有自己本身的属性、方法和事件,其中就有绘图的方法,js能够调用它来进行绘图
// 当浏览器不支持 canvas 时, <canvas></canvas> 标签内的文字才会显示
<canvas id="canvas" style="border: 1px solid #aaa; display: block;">
当前浏览器不支持Canvas,请更换浏览器后再试。
</canvas>

<script>
    window.onload = function(){
        // 获取 canvas
        var canvas = document.getElementById("canvas");

        // 设置 canvas 的画布大小
        canvas.width = 1024
        canvas.height = 768
    }
</script>
基本知识
获取绘图上下文环境
var context = canvas.getContext("2d"); // 目前 Canvas 并不支持 3d
Canvas 元素绘制图像的时候有两种方法,分别是:
context.fill() 填充
context.stroke() 绘制边框
在绘制之前,要设置好绘图的样式:
context.fillStyle 填充的样式
context.strokeStyle 边框的样式
颜色的表示方式:
直接用颜色名称 : "red" "green" "blue"
十六进制颜色值 : #ffffff
rgb(255, 255, 255)
rgba(255, 255, 255, 透明度)
绘制矩形
context.fillRect(x, y, width, height) strokeRect(x, y, width, height)
x 矩形起点的横坐标
y 矩形起点纵坐标
width 矩形长度
height 矩形高度
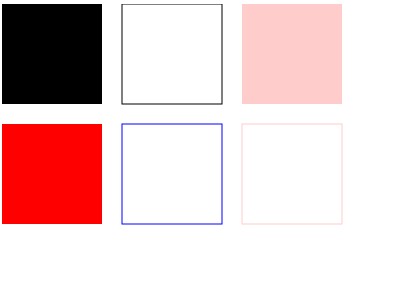
function drawRect(id){
    var canvas = document.getElementById(id);
    var context = canvas.getContext("2d");

    // 不设置 fillStyle 下默认 fillStyle = black
    context.fillRect(0, 0, 100, 100);
    // 不设置 strokeStyle 下默认为 black
    context.strokeRect(120, 0, 100, 100);

    // 设置纯色
    context.fillStyle = "red";
    context.strokeStyle = "blue";
    context.fillRect(0, 120, 100, 100);
    context.strokeRect(120, 120, 100, 100);

    // 设置透明度,值>=1时为纯色,值<=0时为完全透明
    context.fillStyle = "rgba(255,0,0,0.2)";
    context.strokeStyle = "rgba(255,0,0,0.2)";
    context.fillRect(240,0 , 100, 100);
    context.strokeRect(240, 120, 100, 100);
}
清除矩形区域
context.clearRect(x, y, width, height)
x 清除矩形的起点横坐标
y 清除矩形的起点纵坐标
width 清除矩形的长度
height 清除矩形的宽度
function drawRect(id){
    var canvas = document.getElementById(id);
    var context = canvas.getContext("2d");

    // 不设置 fillStyle 下默认 fillStyle = black
    context.fillRect(0, 0, 100, 100);
    // 不设置 strokeStyle 下默认为 black
    context.strokeRect(120, 0, 100, 100);

    // 设置纯色
    context.fillStyle = "red";
    context.strokeStyle = "blue";
    context.fillRect(0, 120, 100, 100);
    context.strokeRect(120, 120, 100, 100);

    // 设置透明度,值>=1时为纯色,值<=0时为完全透明
    context.fillStyle = "rgba(255,0,0,0.2)";
    context.strokeStyle = "rgba(255,0,0,0.2)";
    context.fillRect(240,0 , 100, 100);
    context.strokeRect(240, 120, 100, 100);

    context.clearRect(50, 50, 240, 120);
}

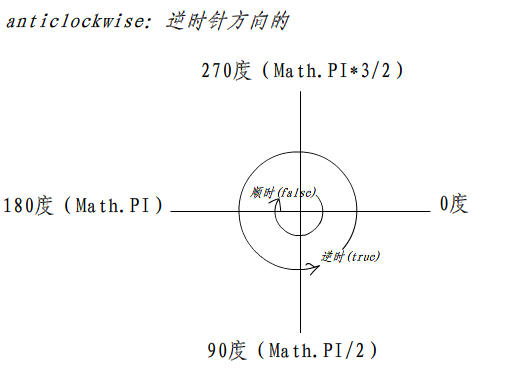
绘制圆弧
context.arc(x, y, starAngle, endAngle, anticlockwise)
x 圆心的横坐标
y 圆心的纵坐标
starAngle 开始角度
endAngle 结束角度
anticlockwise 是否逆时针, true为逆时针, false为顺时针
funtion drawArc(id){
    var canvas = document.getElementById(id);
    if(canvas == null){
        return false;
    }
    var context = canvas.getContext("2d");
    context.beginPath();
    context.arc(200, 150, 100, 0, Math.PI*2, true)
    // 不关闭路径会一直保留下去,当然也可以利用这个特点做出意想不到的事
    context.closePath()
    context.fillStyle = "rgba(0, 255, 0, 0.25)"
    context.fill();
}

路径
context.beginPath()
context.closePath()
function testPath(id) {
     var canvas = document.getElementById(id);
     if (canvas == null) {
         return false;
     }
     var context = canvas.getContext('2d');
     var n = 0;

     //左侧1/4圆弧
     context.beginPath();
     context.arc(100, 150, 50, 0, Math.PI/2 , false);
     context.fillStyle = 'rgba(255,0,0,0.25)';
     context.fill();
     context.strokeStyle = 'rgba(255,0,0,0.25)'
     context.closePath();
     context.stroke();

     //右侧1/4圆弧
     context.beginPath();
     context.arc(300, 150, 50, 0, Math.PI/2 , false);
     context.fillStyle = 'rgba(255,0,0,0.25)';
     context.fill();
     context.strokeStyle = 'rgba(255,0,0,0.25)';
     context.closePath();
     context.stroke();
 }
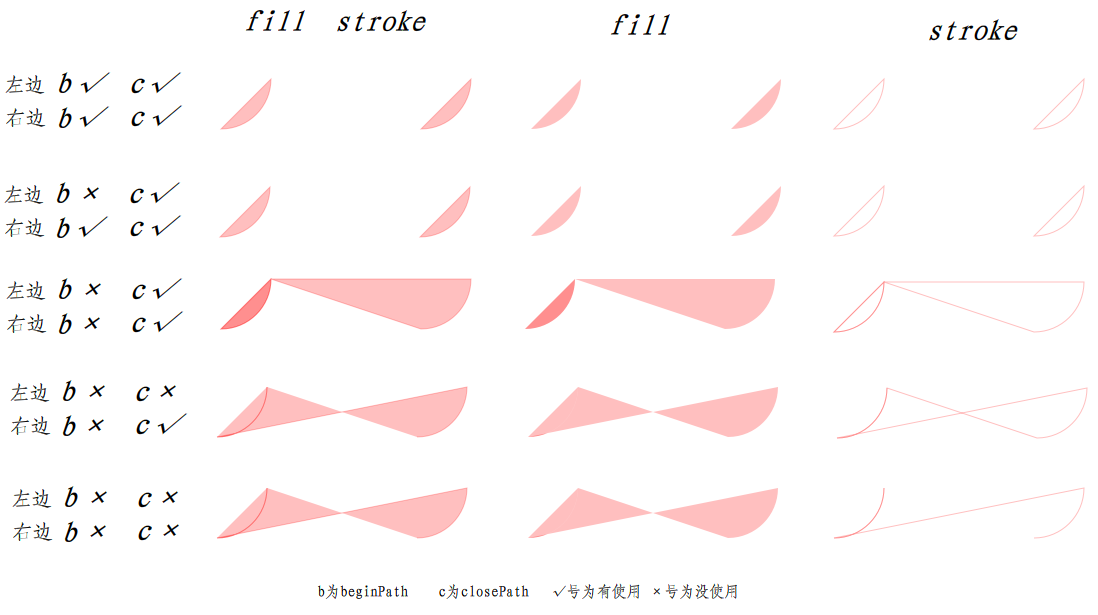
得出的结论有:*号为重点
1、系统默认在绘制第一个路径的开始点为beginPath
*2、如果画完前面的路径没有重新指定beginPath,那么画第其他路径的时候会将前面最近指定的 beginPath() 后的全部路径重新绘制
3、每次调用 context.fill() 的时候会自动把当次绘制的路径的开始点和结束点相连,接着填充封闭的部分
ps:如果没有closePath那么前面的路劲会保留,实验证明正确的结论是 如果没有重新beginPath那么前面的路劲会保留
ps1:如果你真心凌乱了,那么记住每次画路径都在前后加context.beginPath()和context.closePath()就行
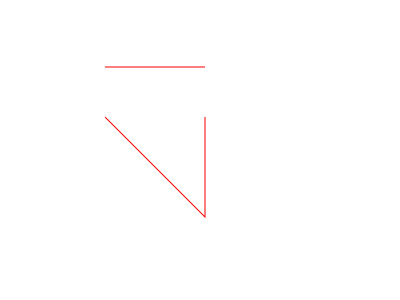
绘制线段
context.moveTo(x, y) context.lineTo(x, y)
每次画线都从 moveTo 的点到 lineTo 的点
如果没有 moveTo, 那么第一次 lineTo 的效果和 moveTo 一样
每次 lineTo 后如果没有 moveTo, 那么下次 lineTo 的开始点为 前一个 lineTo 的结束点
function drawLine(id){
    var canvas = document.getElementById(id);
    var context = canvas.getContext("2d");

    context.strokeStyle = "rgb(255, 0, 0)"
    context.fillStyle = "rgb(255, 0, 0)"

    // 实验证明第一次 lineTo 的时候和 moveTo 的功能一样
    context.lineTo(100, 100)
    // 之后的 lineTo 会以上次的节点为开始
    context.lineTo(200, 200)
    context.lineTo(200, 100)

    context.moveTo(200, 50)
    context.lineTo(100, 50)
    context.stroke()
}
绘制贝塞尔曲线 绘制二次样条曲线
context.bezierCurveTo(cp1x,cp1y,cp2x,cp2y,x,y)
cp1x 第一个控制点的 x 坐标
cp1y 第一个控制点的 y 坐标
cp2x 第二个控制点的 x 坐标
cp2y 第二个控制点的 y 坐标
x 终点 x 坐标
y 终点 y 坐标
关于贝塞尔曲线可以参考百度百科和这篇文章